作业一
运行环境
开始需要搭环境 由于博主在WSL上写代码 也不想下载官方的虚拟机镜像 所以自己搭环境的
作业一主要依赖OpenCV来显示窗口的详细 关于WSL如何搭建OpenCV环境 点击这里
还需要安装线性代数运算库Eigen
sudo apt-get install libeigen3-dev作业
构造绕Z轴旋转矩阵
构造矩阵 需要带入几个特别的向量如和角度 假如旋转了90°
那么(1, 0) -> (0, 1) (0, 1) -> (-1, 0)
代码
Eigen::Matrix4f get_model_matrix(float rotation_angle)
{
    Eigen::Matrix4f model = Eigen::Matrix4f::Identity();

    // TODO: Implement this function
    // Create the model matrix for rotating the triangle around the Z axis.
    // Then return it.

    Eigen::Matrix4f translate;
    float a = rotation_angle * MY_PI / 180.0;
    translate << cos(a), -sin(a), 0, 0, sin(a), cos(a), 0, 0, 0, 0, 1, 0, 0, 0, 0, 1;
    std::cout << "angle = " << rotation_angle << std::endl;
    return translate * model;
}
构造投影矩阵
投影举证的构造特别麻烦 详细投影矩阵构造方法点击这里
几个关键的知识点
- 点的坐标是齐次坐标 经过投影矩阵运算后 其中
w距离眼睛分量w越大距离约远 - 投影矩阵运算后 需要将视锥外的物体剔除 假如不在这个范围$w_c < x_c, y_c, z_c < w_c$的点将会被剔除
- 在世界坐标的观察点是原点向
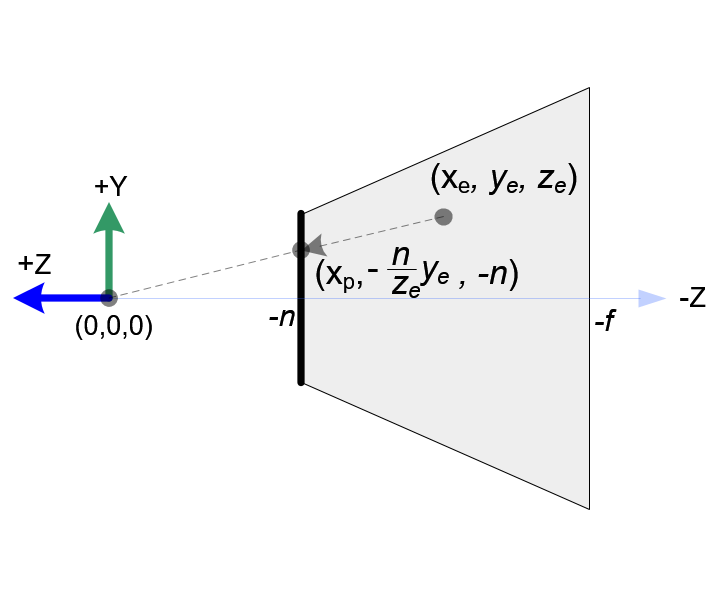
-z轴看去 由于之前的世界坐标是右手坐标系 而标准设备坐标系是左手坐标系 - 构造矩阵的要点就是通过视锥 和远屏幕近屏幕组成的观察箱 然后经过像似三角形算出 观察箱内的点$(x_e, y_e, z_e)$ 投影到近平面的点$(x_n, y_n, z_n)$

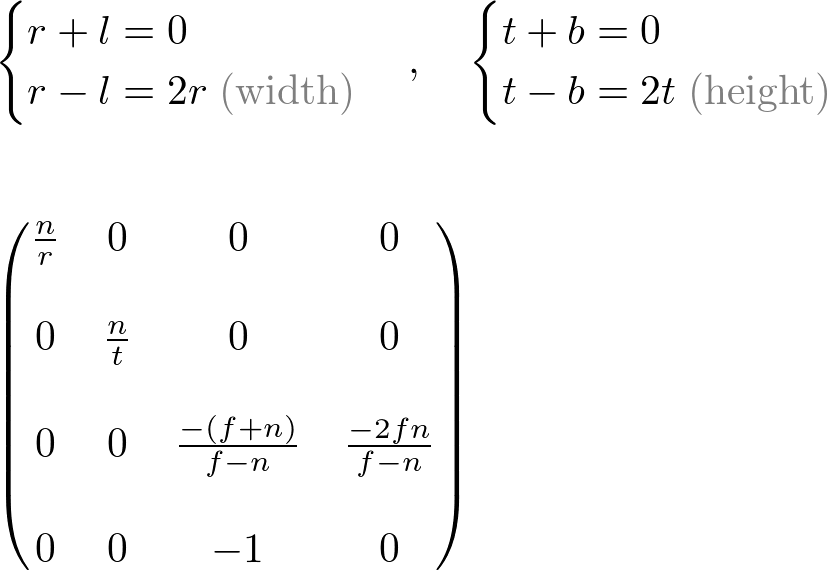
公式如下

代码
Eigen::Matrix4f get_projection_matrix(float eye_fov, float aspect_ratio,
                                      float zNear, float zFar)
{
    // Students will implement this function

    Eigen::Matrix4f projection = Eigen::Matrix4f::Identity();

    // TODO: Implement this function
    // Create the projection matrix for the given parameters.
    // Then return it.
    float a = eye_fov * MY_PI / 180.0;
    float top = tan(a * 0.5) *zNear;
    float right = top * aspect_ratio;

    projection << (zNear / right), 0, 0, 0, 0, (zNear / top), 0, 0, 0, 0, -(zFar + zNear) / (zFar - zNear), -2 * zFar * zNear / (zFar - zNear), 0, 0, -1, 0;

    return projection;
}
框架学习
代码主要是写了个软渲染 涉及到世界坐标转换为标准化坐标 和如何光栅化一条线段
坐标转换
框架中的坐标转换和OpenLG内的坐标转换类似
首先世界坐标通过MVP矩阵和(x_c / w_c, y_c / w_c, z_c / w_c)转换到标准化设备坐标中
接着通过标准化坐标转化到屏幕坐标中去
void rst::rasterizer::draw(rst::pos_buf_id pos_buffer, rst::ind_buf_id ind_buffer, rst::Primitive type)
{
    if (type != rst::Primitive::Triangle)
    {
        throw std::runtime_error("Drawing primitives other than triangle is not implemented yet!");
    }
    auto& buf = pos_buf[pos_buffer.pos_id];
    auto& ind = ind_buf[ind_buffer.ind_id];

    float f1 = (100 - 0.1) / 2.0;
    float f2 = (100 + 0.1) / 2.0;

    Eigen::Matrix4f mvp = projection * view * model;
    for (auto& i : ind)
    {
        Triangle t;

        Eigen::Vector4f v[] = {
                mvp * to_vec4(buf[i[0]], 1.0f),
                mvp * to_vec4(buf[i[1]], 1.0f),
                mvp * to_vec4(buf[i[2]], 1.0f)
        };
        // 转换到标准化设备坐标
        for (auto& vec : v) {
            vec /= vec.w();
        }
        // 转换到屏幕坐标
        for (auto & vert : v)
        {
            vert.x() = 0.5*width*(vert.x()+1.0);
            vert.y() = 0.5*height*(vert.y()+1.0);
            vert.z() = vert.z() * f1 + f2;
        }

        for (int i = 0; i < 3; ++i)
        {
            t.setVertex(i, v[i].head<3>());
            t.setVertex(i, v[i].head<3>());
            t.setVertex(i, v[i].head<3>());
        }

        t.setColor(0, 255.0,  0.0,  0.0);
        t.setColor(1, 0.0  ,255.0,  0.0);
        t.setColor(2, 0.0  ,  0.0,255.0);

        rasterize_wireframe(t);
    }
}
光栅化
转化到屏幕坐标和需要光栅化
- 这里涉及到如何将屏幕坐标的浮点数转化成定点 然后通过顶点设置颜色缓冲的图像
- 如何通过两点 离散的画一条直线
画直线则是通过算法Brenshan
大致思想就是
- 由于我们是类似的网格 我们可$x_i$ 分量每移动一格 通过类似斜率m是否大于2的方法判断y分量有没有增长 通过是否增长判断下次斜率
- 由于正负关系 需要分四个象限讨论
// Bresenham's line drawing algorithm
// Code taken from a stack overflow answer: https://stackoverflow.com/a/16405254
void rst::rasterizer::draw_line(Eigen::Vector3f begin, Eigen::Vector3f end)
{
    auto x1 = begin.x();
    auto y1 = begin.y();
    auto x2 = end.x();
    auto y2 = end.y();

    Eigen::Vector3f line_color = {255, 255, 255};

    int x,y,dx,dy,dx1,dy1,px,py,xe,ye,i;

    dx=x2-x1;
    dy=y2-y1;
    dx1=fabs(dx);
    dy1=fabs(dy);
    px=2*dy1-dx1;
    py=2*dx1-dy1;

    if(dy1<=dx1)
    {
        if(dx>=0)
        {
            x=x1;
            y=y1;
            xe=x2;
        }
        else
        {
            x=x2;
            y=y2;
            xe=x1;
        }
        Eigen::Vector3f point = Eigen::Vector3f(x, y, 1.0f);
        set_pixel(point,line_color);
        for(i=0;x<xe;i++)
        {
            x=x+1;
            if(px<0)
            {
                px=px+2*dy1;
            }
            else
            {
                if((dx<0 && dy<0) || (dx>0 && dy>0))
                {
                    y=y+1;
                }
                else
                {
                    y=y-1;
                }
                px=px+2*(dy1-dx1);
            }
//            delay(0);
            Eigen::Vector3f point = Eigen::Vector3f(x, y, 1.0f);
            set_pixel(point,line_color);
        }
    }
    else
    {
        if(dy>=0)
        {
            x=x1;
            y=y1;
            ye=y2;
        }
        else
        {
            x=x2;
            y=y2;
            ye=y1;
        }
        Eigen::Vector3f point = Eigen::Vector3f(x, y, 1.0f);
        set_pixel(point,line_color);
        for(i=0;y<ye;i++)
        {
            y=y+1;
            if(py<=0)
            {
                py=py+2*dx1;
            }
            else
            {
                if((dx<0 && dy<0) || (dx>0 && dy>0))
                {
                    x=x+1;
                }
                else
                {
                    x=x-1;
                }
                py=py+2*(dx1-dy1);
            }
//            delay(0);
            Eigen::Vector3f point = Eigen::Vector3f(x, y, 1.0f);
            set_pixel(point,line_color);
        }
    }
}
此处评论已关闭